SLS Lecture 8 : Writing some simple assembly programs
Contents
8. SLS Lecture 8 : Writing some simple assembly programs#
Spend some time writing some very simple assembly programs and learn to use the debugger so that we have enough skills to explore how things work. We will be repeat various things in more detail in future lectures.
Write
popcntin assemble codeuse gdb to play with the popcnt program
Write a simple
addin assembly codeuse gdb to play with the add program
using the cpu as a glorified calculator
first pass at CPU support for “numbers”
What happens if we let our programs continue
how do we successfully “halt/end” our execution
int3traptells OS to return control to debugger
more generally how can we make a Kernel/System Call
revisit
addprograms adding exitsint3exitsyscall
Implicitly use our shell, editor, Make and Git knowledge to do the above
8.1. Writing a popcnt assembly program#
Write a one instruction assembly program
first using .byte
using intel assembly instruction
Use gdb to explore how this instruction works
learn to use gdb to set register values
and how to execute and re-execute an instruction
8.1.1. Setup#
make directory
open emacs and write
popcnt.s
Skipping git for time.
make a directory for our work :
mkdir simpleasmcd simpleasm
emacs popcnt.s
CODE: asm - The 'popcnt' assembly program
	.intel_syntax noprefix

	.section .text

	.global _start
_start:
	popcnt rax, rbx   # same as  .byte 0xF3, 0x48, 0x0F, 0xB8, 0xC3
Here is a fully commented version of the same code.
CODE: asm - The commented 'popcnt' assembly program
/*  General antomy of a assembly program line
[lablel]:   <directive or opcode> [operands]  # comment
*/
	.intel_syntax noprefix   # assembler syntax to use <directive>
	                         # set assembly language format to intel

	.section .text           # linker section <directive>
	                         # let the linker know that what follows are cpu instructions to
	                         # to be executed -- uposed to values that represent data.
	                         # For historical reasons cpu instructions are called "text"

	.global _start           # linker symbol type <directive>
	                         # makes the symbol _start in this case visible to the linker
	                         # The linker looks for an _start symbol so that it knows address
	                         # of the first instruction of our program

_start:                          # introduce a symbolic (human readable) label for "this" address
	                         # associates the address of this point in our program with the
      	                         # name following the ':' -- in our case _start
	                         # In our program or in the debugger we can use this name to
	                         # to refer to this location -- address.  And thus the values
	                         # that end up here.
#	.byte 0xF3, 0x48, 0x0F, 0xB8, 0xC3  # popcnt rax,rbx
	popcnt rax, rbx          # ok the single intel opcode (instruction) that makes up
	                         # our program
/*
     Details about the assembler directives and general syntax that we will be using
     https://sourceware.org/binutils/docs/as/
     Intel instruction set reference -- documents the cpu memonics/instructions of
                                    the computer's processor that we are writing for
	 https://software.intel.com/content/www/us/en/develop/download/intel-64-and-ia-32-architectures-sdm-combined-volumes-2a-2b-2c-and-2d-instruction-set-reference-a-z.html
*/
We can use the .byte directive to set the values in memory to anything we like
eg.
.byte 0xF3, 0x48, 0x0F, 0xB8, 0xC3
But of course the real value is that we could have also simply written
popcnt rax, rbx
#To assemble and link the code we will use the following command:
as -g popcnt.s -o popcnt.o
ld -g popcnt.o -o popcnt

# We can automate this using a makefile so that all we would need to do is:
make popcnt
# To get the debugger going:
  gdb -x setup.gdb popcnt

# setup.gdb set intel assembly syntax and configures tui

# Now we want use gdb command to poke around popcnt

# Set a breakpoint at the start symbol so exection will stop their:
  break _start
# Start the program running:
  run
# play around with popcnt

set $rbx = 0b11
set $rbx = 0xFFFE
8.2. Writing an add assembly program#
re-enforce the steps to creating and debugging an assembly program
begin to explore CPU support for working with “numbers”
we will get into how numbers “work” later
learn enough so that you can poke around yourself
get an idea of cool things that INTEL instructions can do
try adding some variables in memory to our program
Lets work with the
addinstruction in a similar way that we did withpopcntexplore the results of adding with binary, hex, unsigned and signed values
explore overflow
then make the program a little more complex:
  movabs rbx, 0xdeadbeefdeadbeef
  mov    rax, 1
  add    rax, rbx
lets use some more cool features of the intel instruction set
  rdrand rbx
  mov    rax, 1
  add    rax, rbx
  popcnt rbx, rax
lets get a brief glimpse at how to use memory locations for the value
        .intel_syntax noprefix
        .data
x:       .quad 142
y:       .quad 4200
sum:     .quad

        .text
        .global _start
_start:
        mov rax, QWORD PTR x
        add rax, QWORD PTR y
        mov QWORD PTR sum, rax
	.intel_syntax noprefix

	.text
	.global _start
_start:
	add rax, rbx
# add targets to Makefile
make add

as -g add.s -o add.o
ld -g add.o -o add
gdb -x setup.gdb add
break _start
run
8.2.1. Exercises#
try repeating what we did with
addwithimul,and,or,xor: for eachcreate a new file
add targets to Makefile for it
use gdb to explore what the instruction does
8.3. Ending / Exiting our Program/Process#
What happens if we run our programs outside of the debugger?
why does this happen?
8.3.1. How can we avoid this#
TRAP: Use an instruction that tells the OS to
stop the process and give control back to the debuggger
if no debugger is running just kill process and signal shell
Instruction:
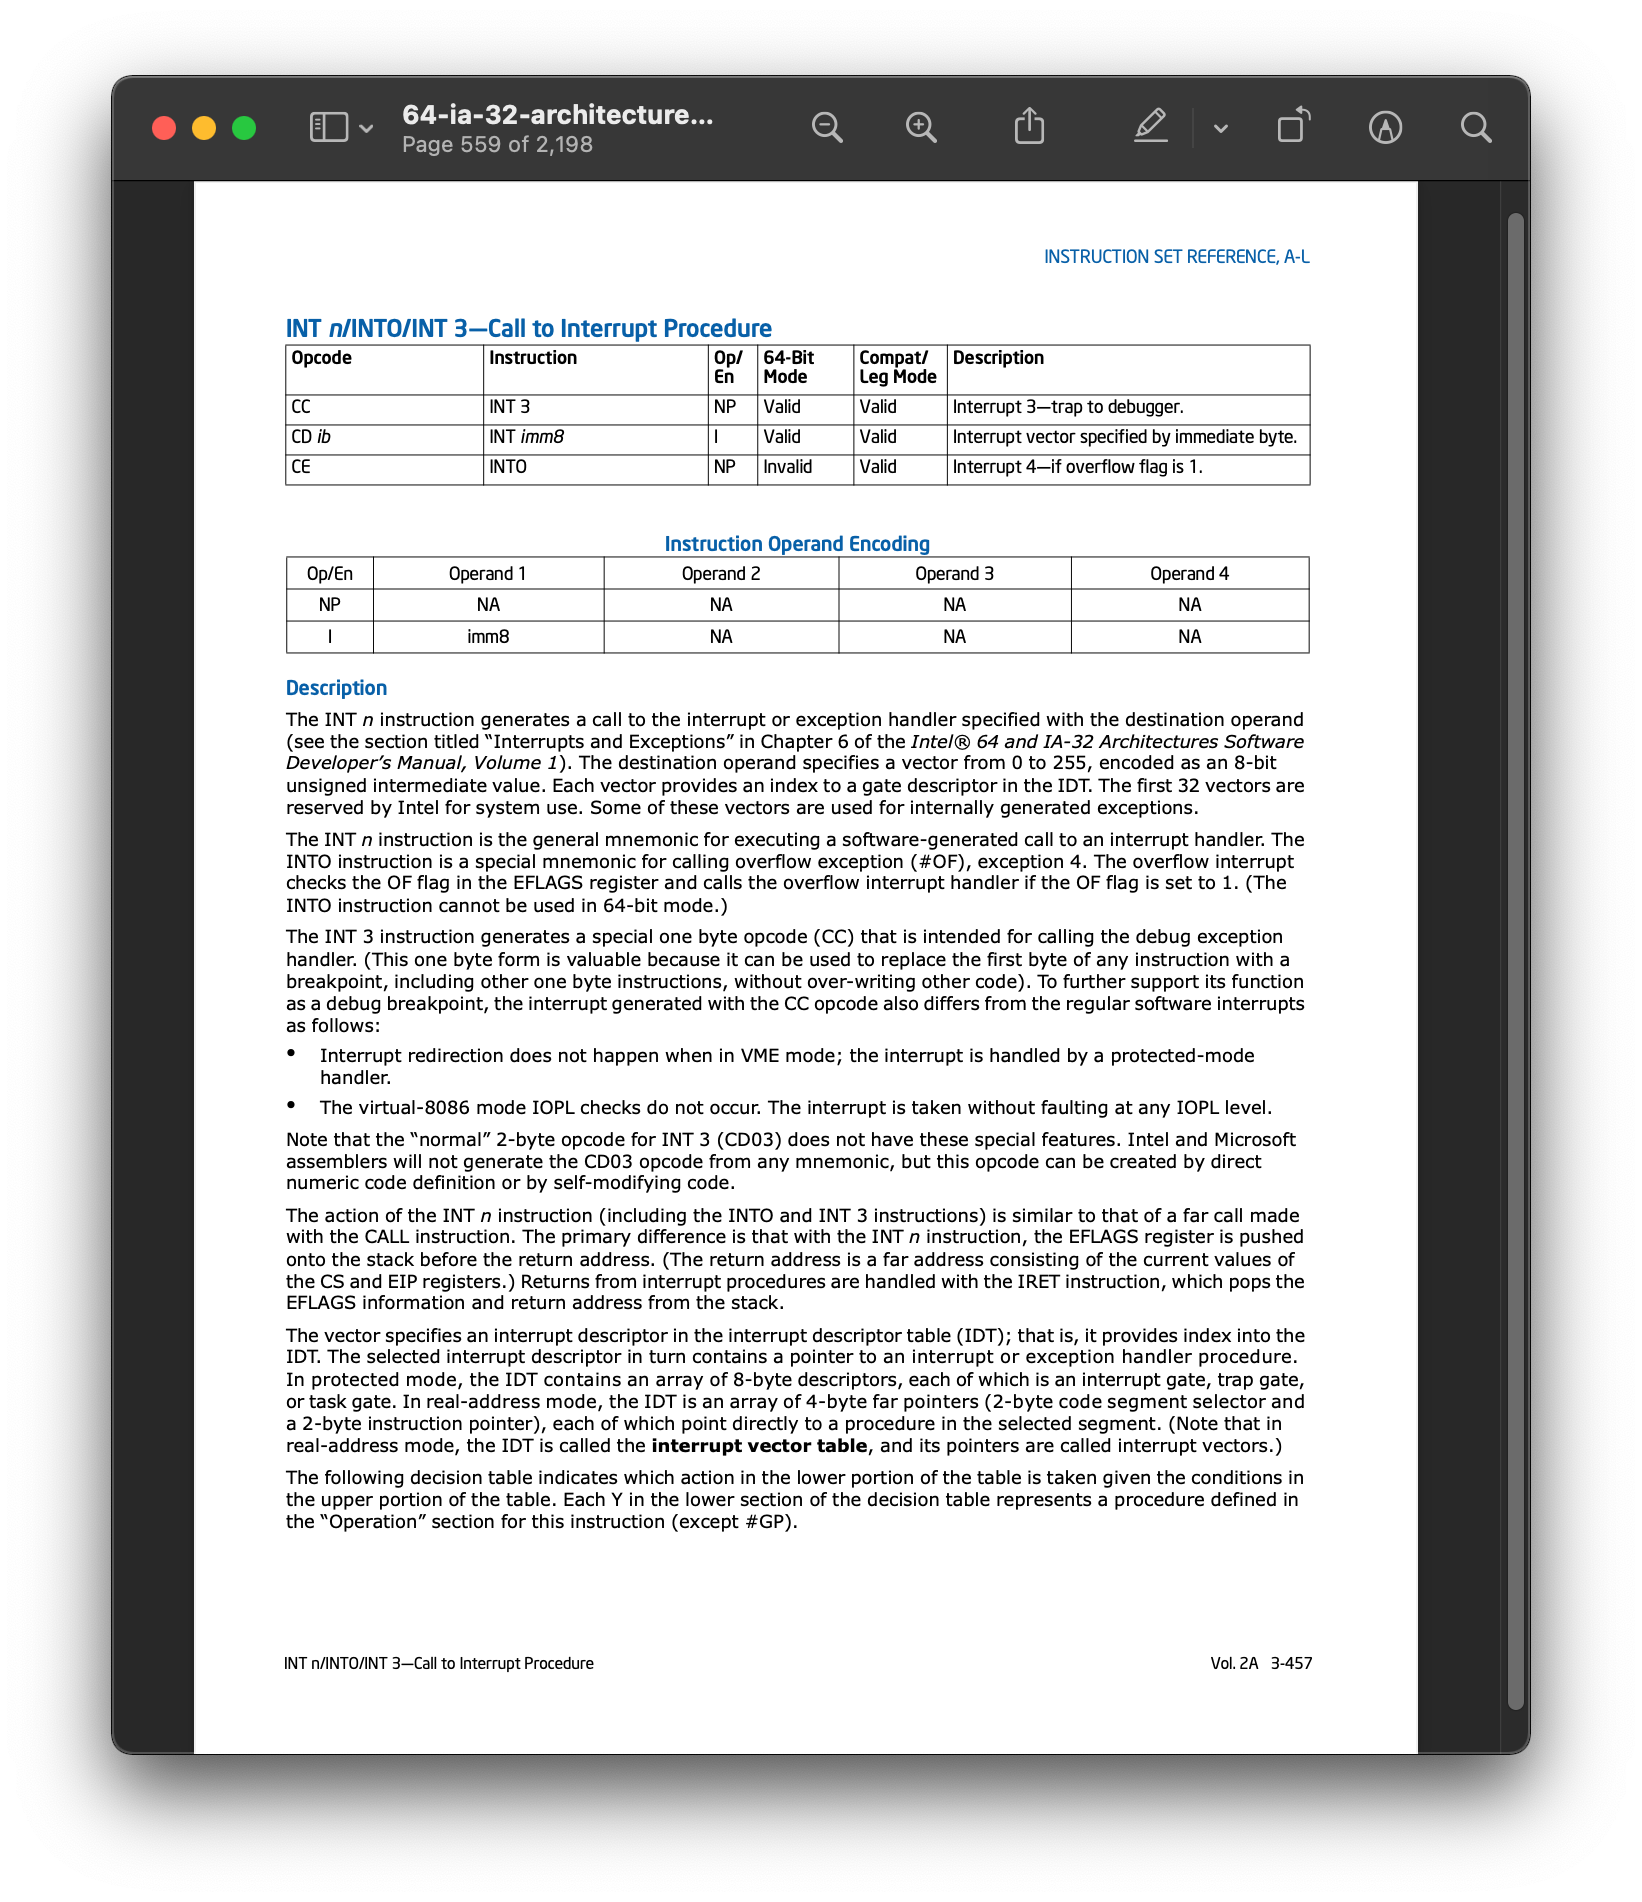
int3:Opcode:
0xCCDescription:
Interrupt 3 — trap to debugger
Call OS Kernel Exit Process call
This is an example of calling an OS Kernel call to have the kernel do something for your process
We will look at this more but for the moment here is what is necessary to call
exitpass return value to Kernel
exit/terminate process
8.3.2. Interrupt 3 int3 – trap to debugger#
	.intel_syntax noprefix

	.text
	.global _start
_start:
	int3
8.3.3. Exit – An OS service to terminate a process#
To exit your process and return an exit value
requires a call to the OS!
On Intel the instruction is syscall
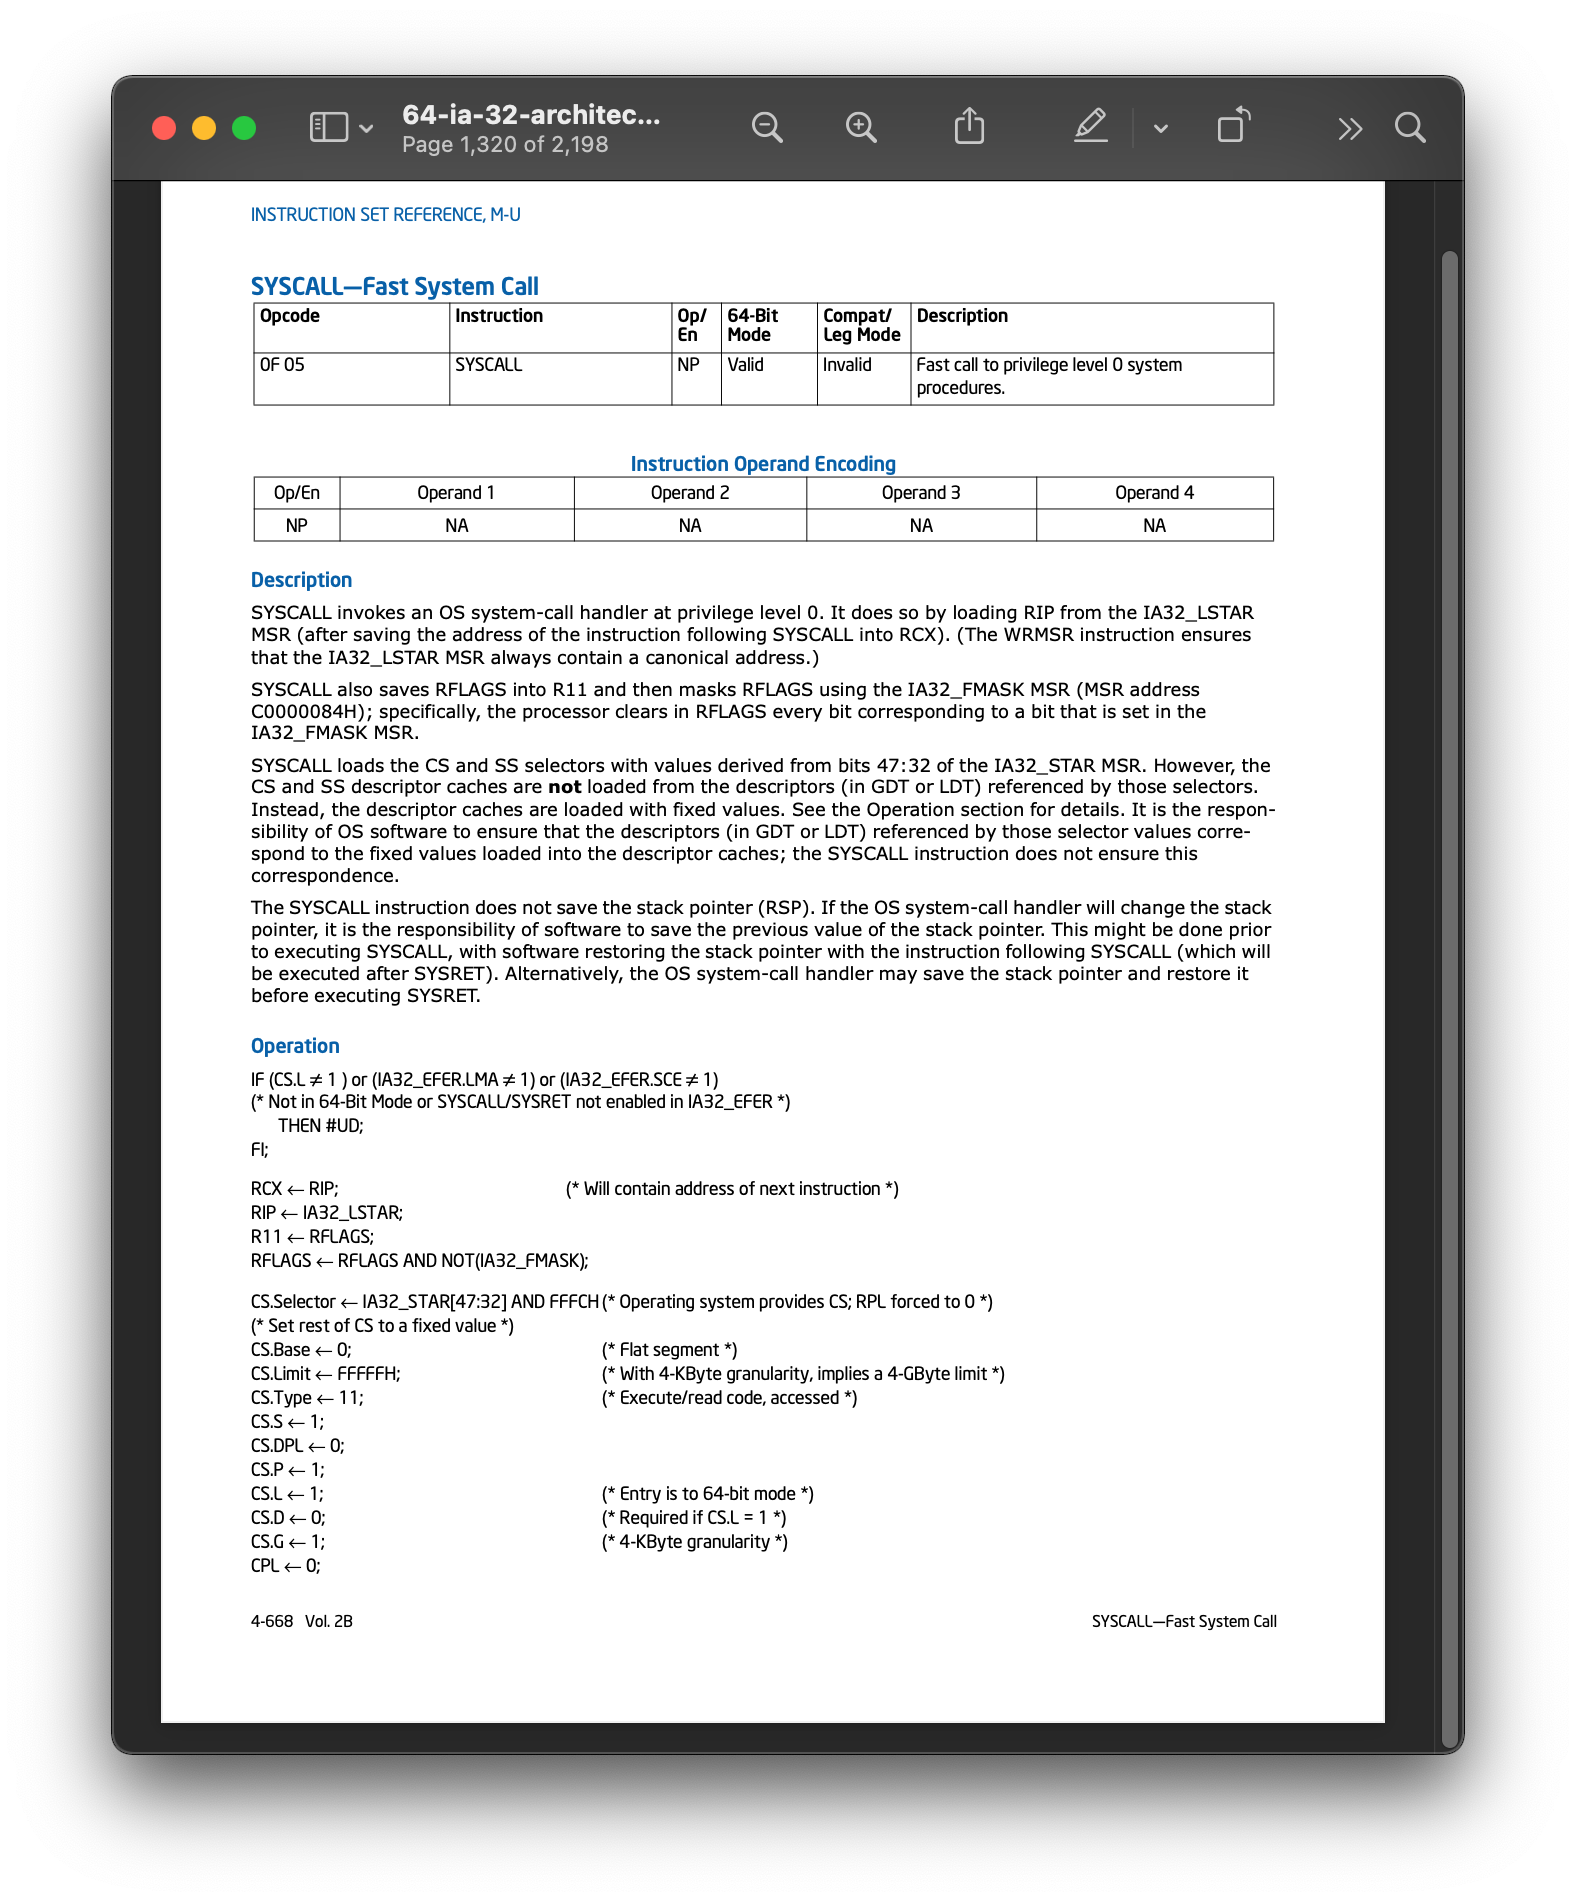
8.3.4. The OS System Calls#
Each OS Kernel provides a set of calls that an a process can invoke using the syscall instruction on an Intel based computer
The Linux Kernel supports a very large number of system calls each is identified by a unique number that must be placed in RAX prior to executing the syscall instruction. Additional arguments are passed in by setting other registers.
With each version of the Kernel the table of calls changes. Here is one site that provides a list
From the above we can see that the
exitsystem call number is60reading some man pages
man syscallandman syscallswe find thatwe must place
60inraxand that the value we want to return in
rdi
	.intel_syntax noprefix

	.text
	.global _start
_start:
	mov     rax, 60    # Linux exit system call number is 60
	mov     rdi, 0     # rdi is return value 0 success

	syscall
We will revisit OS system calls in more detail later
this is good enough for the moment
8.3.4.1. Avoiding Hard coding system call numbers#
Operating system code usually provides files that you can include in your code so that you don’t have to hardcode magic numbers like 60 for exit. In Linux you can add the following file #include <asm/unistd_64.h> to get all the system call numbers. You can then use __NR_exit to mean the number for the exit system call.
eg. exitfancy.S
#include <asm/unistd_64.h>
    .intel_syntax noprefix
    .text
    .global _start
_start:
    mov rax,__NR_exit # exit system call number
    mov rdi,0         # UNIX success value is 0
    syscall           # call OS. This will not return
But the assemble does not support have support for including files. We must first use another tool called a preprocessor eg.
cc -E exitfancy.S > exitfancy.s
as -g exitfancy.s -o exitfancy.o
ld -g exitfancy.o -o exitfancy
In general we will just skip this and we will just use hardcoded numbers.
8.4. Exercises and extra materials#
rewrite all the examples to use int3 at the end
rewrite all the examples to call OS exit call
combine some of the examples
see what happens when you add
1to0xffffffffffffffffusing the add instructions.any idea what is going on?
8.4.1. Makefile for all the lecture examples#
popcnt: popcnt.o
        ld -g popcnt.o -o popcnt

popcnt.o: popcnt.s
        as -g popcnt.s -o popcnt.o

add: add.o
        ld -g add.o -o add

add.o: add.s
        as -g add.s -o add.o

exit: exit.o
        ld -g exit.o -o exit

exit.o: exit.s
        as -g exit.s -o exit.o

int3: int3.o
        ld -g int3.o -o int3

int3.o: int3.s
        as -g int3.s -o int3.o

exitfancy: exitfancy.o
        ld -g exitfancy.o -o exitfancy

exitfancy.o: exitfancy.s
        as -g exitfancy.s -o exitfancy.o

exitfancy.s: exitfancy.S
        cc -E exitfancy.S > exitfancy.s

clean:
        -rm -f $(wildcard *.o  popcnt  add int3 exit exitfancy exitfancy.s)
8.4.2. Here is a fully documented fancy version of exit#
We use the the preprocessor to include the OS system call numbers
and we use the
.equdirective of the assembler to make our code more readable
A commented version that avoids "magic" numbers.
	# Pull in a file that contains all the OS system call numbers
	# for this to work we must preprocess this file via gcc -E before
	# we can assemble it with as so that the contents of the header file
	# will be included

#include <asm/unistd_64.h>

	# See discussion bellow to understand what is in this file

	.intel_syntax noprefix   # set assembly language format to intel

	# Define some constants so that we don't have magic numbers
	# in our code.  We use the .equ (equal) assembly directive
	# "This directive sets the value of symbol to expression."
	# (https:#sourceware.org/binutils/docs/as/Equ.html#Equ)
	# FORMAT:
	# .equ <SYMBOL>, <EXPRESSION>

	.equ UNIX_SUCCESS_VALUE, 0
	.equ LINUX_SYSCALL_EXIT, __NR_exit

	.text                    # Place the following in the area that
	                         # instruction should be encoded and stored
	                         # for historical reasons it is called text
	.global _start
_start:                          # The linker knows to mark the _start address
                              	 # as location where execution should begin.
	                         # The OS will be sure to setup the CPU so that the
	                         # program counter is initialized with this address

	# To voluntarily hand control of the cpu back to the Operating system so it can
	# do somthing for us we use a special instruction
	#  -- on x86_64 this instruction is syscall (man syscall - table 1)
	#
	# Operating systems provide many functions that a program can call to
	# get things done.  eg.  open a stream, read or write bytes to or from a stream
	# or simply terminate and exit our program.
	#
	# Each call is identifed by a number we call a system call number.
	# On LINUX it expects us to load rax register with the system call number
	# prior to executing the syscall.  Once control is handed over to the OS
	# It will then look the number up and invoke the approriate function inside itself.
	# Other registers can be used to pass parmeters to the particular OS system call function
	# that we want to invoke.  The following is the conventions on X86_64 Linux
	#
	#       Arch/ABI      arg1  arg2  arg3  arg4  arg5  arg6  arg7
        # ────────────────────────────────────────────────────────────
        #       x86-64        rdi   rsi   rdx   r10   r8    r9    -
	# (see man syscall -- table 2)
	# The list of all Linux system call numbers can be found in a file so that programers
	# can know what number to use to invoke a particular call
	# On our installation of linux you can find it here
	#  /usr/include/x86_64-linux-gnu/asm/unistd_64.h
	# For an explanation of all the systems calls see man syscalls (note the s)
	# -- When we switch to understanding C we it will be easier to understand
	#    the above manual pages
	#
	# On LINUX
	#   One of these calls is the EXIT system call that tells OS our program is done
	#   (see man 2 exit)

	mov     rax, LINUX_SYSCALL_EXIT        # load rax with the Linux system call number for
	                                       # exit

	mov     rdi, UNIX_SUCCESS_VALUE        # load rdi with the exit status value we want
	                                       # to pass back to the program that launched us
	                                       # eg. the shell in which we ran our program from

	syscall                                # use the syscall instruction to hand control over
	                                       # to the OS.  Note since we will be terminated
	                                       # this instruction will be our last and nothing else
	                                       # need follow it